MingW를 설치하면, pthread library가 설치되지 않으므로 pthread 기능을 사용할 수 없다.
본 글은 eclipse(CDT) + MingW에서 pthread를 사용하기 위한 설정법을 기술한다.
eclipse(CDT)는 이미 설치되어 있다고 가정하고 있다.
1. 최신 pthread-win32를 받는다.
2. 기 빌드된 파일들을 이동한다.
압축을 해제하면, 다음의 폴더구조를 확인할 수 있다.
[압축해제폴더]\Pre-built.2 <-- 미리 빌드된 헤더와 라이브러리를 포함한 폴더
[압축해제폴더]\pthreads.2 <-- 소스를 포함한 폴더
[압축해제폴더]\QueueUserAPCEx
3. eclipse 프로젝트 세팅을 한다.
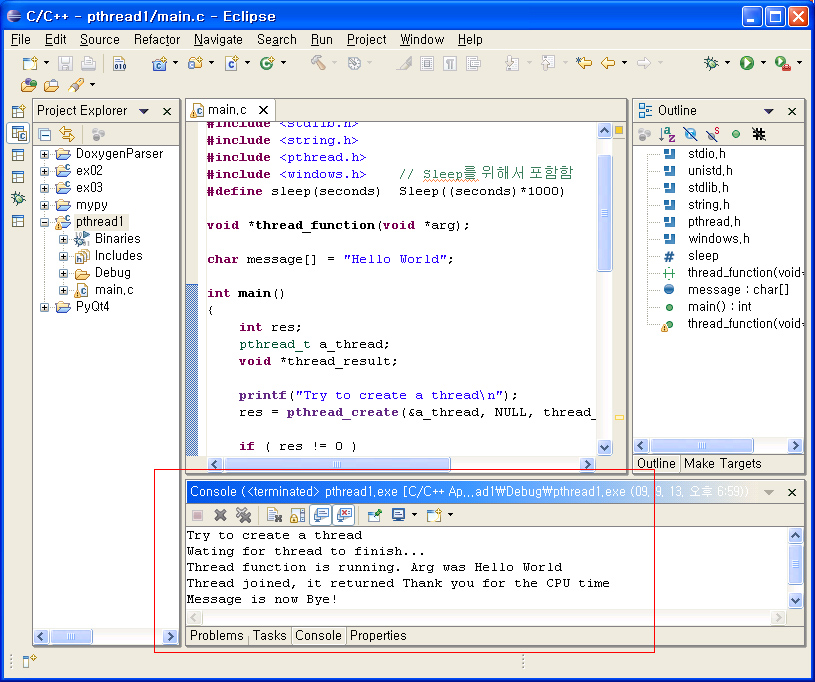
eclipse를 사용하여 예저 C Project를 생성한다. 프로젝트가 완성되면, 다음의 main.c 를 추가한다. 예제 소스는 Beginning Linux Program Chapter 12의 thread1.c 를 약간 수정하였다.
빌드를 하기전, 컴파일러/링커 세팅을 한다.
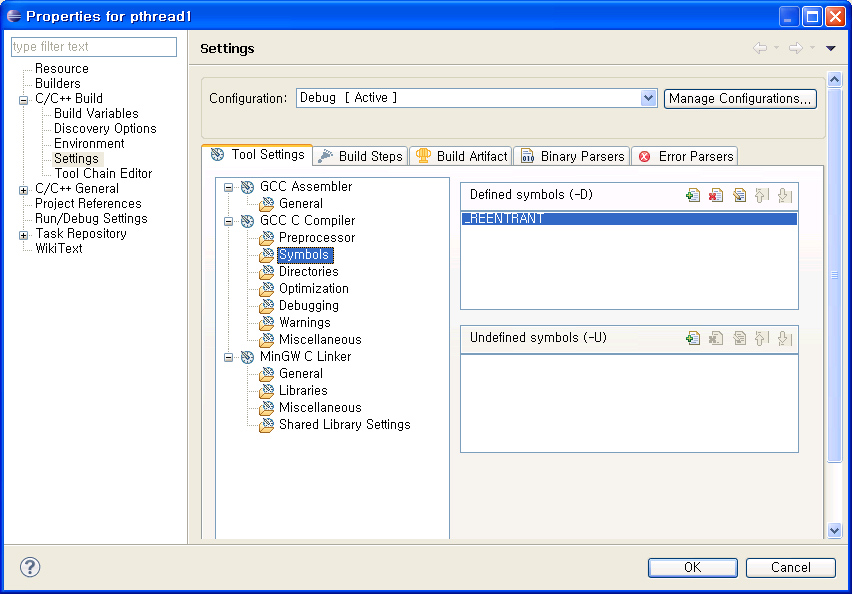
3.1 컴파일러 세팅
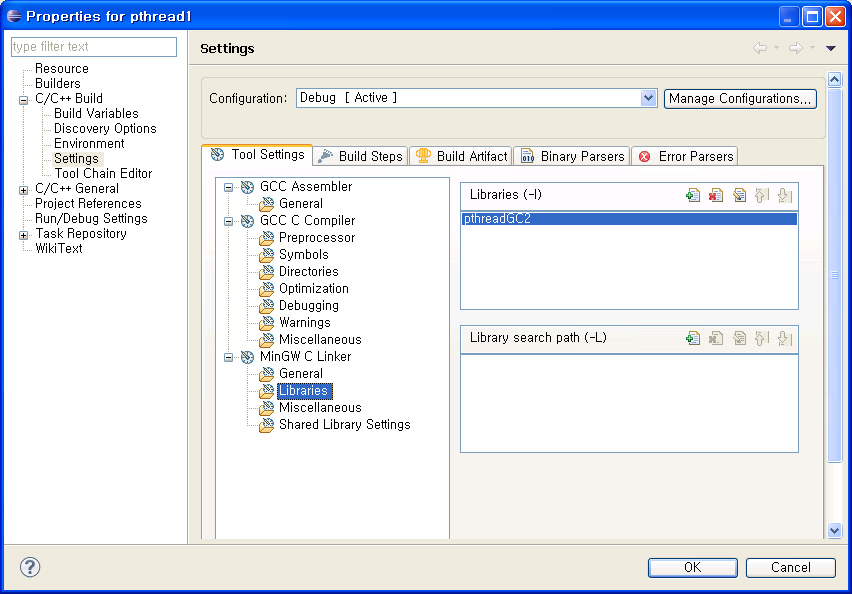
3.2 링커 세팅
4. 예제 프로그램을 수행하여 동작여부를 확인한다.
본 글은 eclipse(CDT) + MingW에서 pthread를 사용하기 위한 설정법을 기술한다.
eclipse(CDT)는 이미 설치되어 있다고 가정하고 있다.
1. 최신 pthread-win32를 받는다.
- http://sourceware.org/pthreads-win32/ 에서 받는다.
- 본 글에서는 pthreads-w32-2-8-0-release.exe 를 사용하였다.
2. 기 빌드된 파일들을 이동한다.
압축을 해제하면, 다음의 폴더구조를 확인할 수 있다.
[압축해제폴더]\Pre-built.2 <-- 미리 빌드된 헤더와 라이브러리를 포함한 폴더
[압축해제폴더]\pthreads.2 <-- 소스를 포함한 폴더
[압축해제폴더]\QueueUserAPCEx
- 헤더 파일을 이동한다.
- [압축해제폴더]\Pre-built.2\include 에 있는 헤더파일을 [MingW Root]\include 로 복사한다.
- 라이브러리 파일을 이동한다.
- [압축해제폴더]\Pre-built.2\lib의 libpthreadGC2.a와 libpthreadGCE2.a 파일을 [MingW Root]\lib 로 복사한다.
- [압축해제폴더]\Pre-built.2\lib의 libpthreadGC2.dll와 libpthreadGCE2.dll 을 dll 패스가 잡혀있는 곳으로 복사한다. ex) C:\WINDOWS\system32
3. eclipse 프로젝트 세팅을 한다.
eclipse를 사용하여 예저 C Project를 생성한다. 프로젝트가 완성되면, 다음의 main.c 를 추가한다. 예제 소스는 Beginning Linux Program Chapter 12의 thread1.c 를 약간 수정하였다.
#include <stdio.h>
#include <unistd.h>
#include <stdlib.h>
#include <string.h>
#include <pthread.h>
#include <windows.h> // Sleep를 위해서 포함함
#define sleep(seconds) Sleep((seconds)*1000)
void *thread_function(void *arg);
char message[] = "Hello World";
int main()
{
int res;
pthread_t a_thread;
void *thread_result;
printf("Try to create a thread\n");
res = pthread_create(&a_thread, NULL, thread_function, (void *)message);
if ( res != 0 )
{
perror("Thread creation failed");
exit(EXIT_FAILURE);
}
printf("Wating for thread to finish...\n");
res = pthread_join(a_thread, &thread_result);
if ( res != 0 )
{
perror("Thread join failed");
exit(EXIT_FAILURE);
}
printf("Thread joined, it returned %s\n", (char *)thread_result);
printf("Message is now %s\n", message);
exit(EXIT_SUCCESS);
}
void* thread_function(void *arg)
{
printf("Thread function is running. Arg was %s\n", (char *)arg);
sleep(3);
strcpy(message, "Bye!");
pthread_exit("Thank you for the CPU time");
}
빌드를 하기전, 컴파일러/링커 세팅을 한다.
3.1 컴파일러 세팅
3.2 링커 세팅
4. 예제 프로그램을 수행하여 동작여부를 확인한다.